A clean Revit start file is the backbone of any BIM workflow. Get the setup wrong and you’ll spend hours fixing broken levels, rogue view names, and mismatched line weights. Follow the checklist below and you’ll start every project the way professional studios do.
The 10-Step Setup Table
| # | Step | What to do | Why it matters |
|---|---|---|---|
| 1 | Project Units | Manage → Project Units → Metric (millimetres) | Schedules sort and round correctly; no mix up with imperial families. |
| 2 | Levels & Grids | Add levels first, then structural grids | Every view and dimension references these datums. |
| 3 | Duplicate View Templates | Copy “Architectural Plan,” rename A-GA-PLAN 1:100 | ISO 19650 naming from day one prevents the “rename 72 views” nightmare. |
| 4 | Load Your Title Block | Insert A1 & A3 title-block families | Sheets inherit correct parameters. No rework later. |
| 5 | Link the Site Survey | Insert → Link CAD (Origin to Origin) | Correct coordinates now = no “model 3 km off site” later. |
| 6 | Enable Worksharing | Collaborate → Worksets → Enable | Auto backups protect you; team collaboration is ready when you are. |
| 7 | Import Office Object Styles | Manage → Transfer Project Standards (Object Styles only) | Line weights and hatches stay consistent across every view. |
| 8 | Create Design Options | Manage → Design Options → New | Explore concept variations without cloning files. |
| 9 | Build the Sheet List Early | View → Schedules → Sheet List | Revit auto populates as sheets appear. Project tracking from day one. |
| 10 | Archive a Copy | File → Save As → M00_TemplateBackup.rvt | Instant roll back if a family or plug in corrupts the file. |
Walk-through and pro-tips
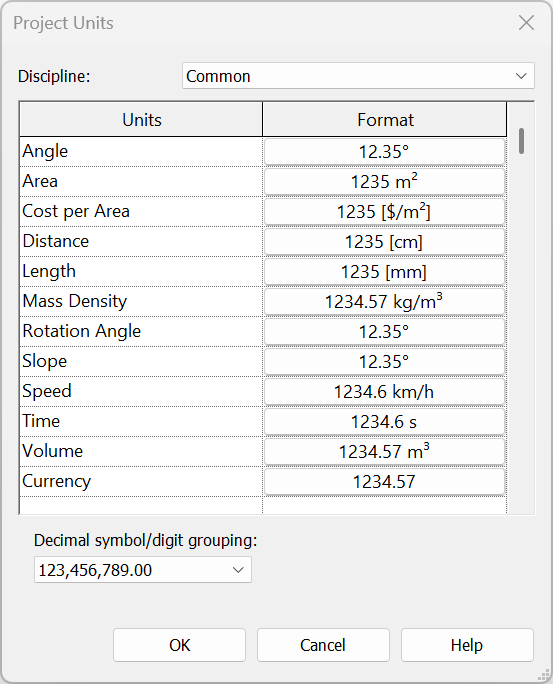
1. Project Units
Open Manage → Project Units and switch discipline to Common → millimetres.
Set Decimal places = 0 for lengths; schedules read cleaner and you avoid “3000.0 mm” clutter.
2. Levels & Grids
Drop Level 0, Level 1, and any basement storeys, then place gridlines. Keep grid bubbles outside the future façade line so they remain visible.
Pitfall: forgetting to name grids before duplicating views. This causes view template errors.
3. Duplicate View Templates
Right-click Architectural Plan, choose Duplicate, rename A-GA-PLAN, set scale 1:100, crop region on. This template will drive every GA plan in your BIM set.
4. Load Title Block
Insert your office or university title-block (A1 and A3). Place one blank sheet now so Revit numbers later sheets automatically.
5. Link the Site Survey
Always use Origin to Origin unless the surveyor’s DWG is true north. Pin the link to stop accidental moves.
[📸]
6. Enable Worksharing
Even if you’re a solo user, enabling worksets creates automatic backups and lets you practice BIM collaboration later.
7. Import Object Styles
Use Transfer Project Standards but tick only Object Styles. That pulls line weights, fills, and sub categories. Without cluttering the model with extra view templates.
8. Create Design Options
Set up Concept A and Concept B so massing alternatives live safely away from the Main Model.
9. Build the Sheet List Early
Create a Sheet List schedule with fields: Sheet Number, Name, Status. As soon as you add sheets, the list updates. Perfect for deadline tracking.
10. Archive a Copy
Hit Save As and append _backup. Tomorrow, if a rogue family crashes your file, simply roll back.
Common pitfalls (and how to dodge them)
| Pitfall | Quick fix |
|---|---|
| Moving the survey link off site | Pin all external links immediately. |
| Mixing templates from other jobs | Stick to a single starter template; foreign files drag in rogue object styles. |
| Editing the default view template | Duplicate & rename. This keeps ISO naming intact. |
Frequently asked
Which Revit versions does the template support?
Tested in 2022, 2023, 2024, and 2025. Earlier versions may lose view templates.
Where do I place the .rte file?C:\ProgramData\Autodesk\RVT <version>\Templates\UK\ – restart Revit and it appears on the start screen.
Do I really need Worksharing if I work alone?
Yes, automatic backups have saved many users from corrupt file disasters.
Time investment: Follow this checklist once and you’ll save hours on the next project. Bookmark it and share with your studio.